Initial Learning
# Initial Learning
The following software is used in development of TASHelix, they are required to be work on the client-side of development.
# JavaScript
It is good to get a refresher on JavaScript, we recommend going through the JavaScript language overview to check your knowledge level. It should take you between 30 minutes to an hour but you should feel more confident when learning React.
# Async/Await
Having a good grasp on async/await is essential for working on the inner-functionality of the helix engine, make sure to have read through and tested the contents of the
Asynchronous Programming Overview.
For extra reading on the topic of promises:
# TypeScript
For type safety we use TypeScript, please read through the TypeScript Handbook, in particular:
# React
React is the web framework used to build TASHelix, it doesn’t provide much in term of components on its own - but we use its syntax combined with React Native (which is further mentioned below) to build TASHelix.
By default React is used with HTML components to build websites - we however are instead using it with React Native which will instead supply us with platform-specific UI components so that when we use a text-box element, that text-box element will be transformed into the appropriate native iOS/Android/MacOS/Windows/Web components when the app is run on those platforms.
# Tutorial
React has a
fantastic introductory tutorial, please read through it up to the Adding Time Travel section as we will not be implementing that.
# Detailed Documentation
Read through the React documentation and familizarize yourself with it, in particular make sure to read through the following sections:
# React Native
To allow our React to run on iOS, Android, MacOS, Windows, and the web - we use ReactNative which provides a React-friendly interface that abstracts over lower-level OS APIs.
Please note that we are NOT using the Expo tool, ignore any mention of it.
# React Native Intro
Please read through the following sections for React Native, with the following sections in particular:
# React Native Components
Now the fun stuff, please read throughh the React Native Components documentation. Familizarize yourself with most of the components and test them out.
# Jest
We use Jest to write auto-tests for the code that we write, it is imoprtant to familiarize yourself with it:
Jest Testing.
The unit tests for this project are stored under the __tests__/ directory and should always be expanded as new code is written.
# Execute
To run the tests simply run yarn test, this will show the results of each test and also show a coverage overview.
It is good to ensure that the tests cover as much code as possible with as many tricky condititions as reasonable.
# Coverage
The coverage overview will be displayed at the end of the test results as the following:
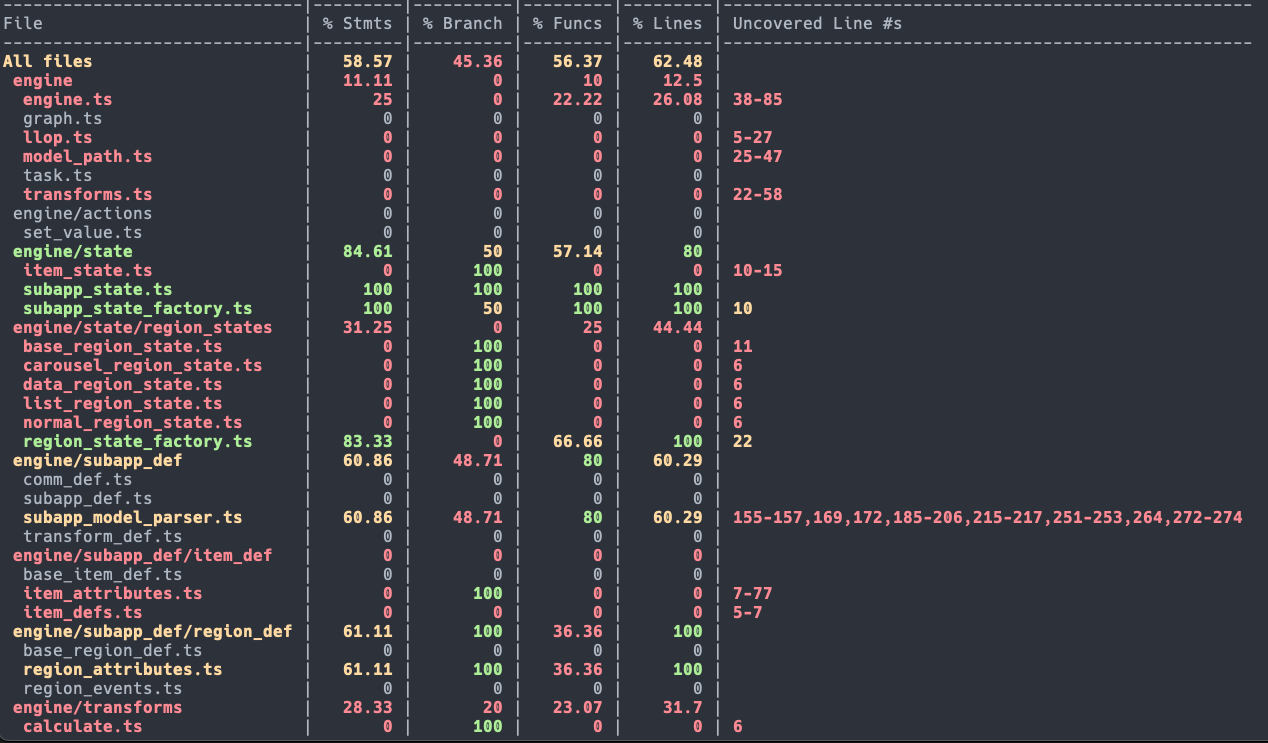 This shows a high level overview of how much code in each file was executed.
To see a detailed version, open test_info/icov-report/index.html, you will see something like this:

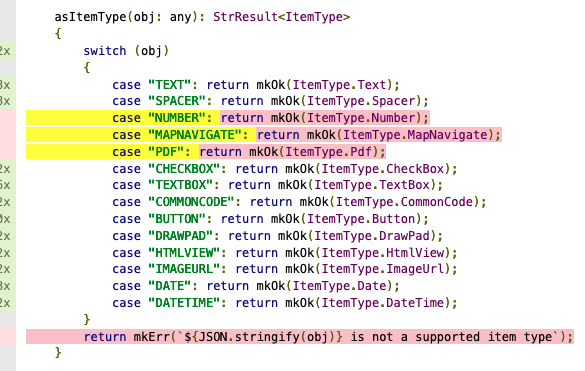
If you open up any particular file that is not 100% covered you will see the expressions and statements that were not executed in any of the tests at-least once highlighted in red.
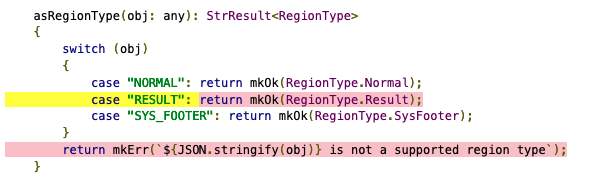
In if/switch statements, often yellow is used to highlight code-paths that were not executed in any of the tests:
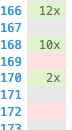
The left-margin will also display how many times a particular line was executed across all
# Next Steps
To setup your machine for development, follow the instructions at Machine Setup.